

While the Russian Ministry of Finance, Russia’s central bank and the Bank of Russia have been at odds over the cryptocurrency market and what should and shouldn’t be permitted, the trading of cryptocurrencies on exchanges has not been banned and is likely to be legalized in July of this year.
As the cryptomarket evolves, different governments and central banks are taking different positions on the purchase, ownership and use of cryptocurrencies. There’s been plenty of news recently of banks around the world banning the purchasing of cryptocurrencies with bank Credit Cards. The Russian government’s plans are to ban the use of cryptocurrencies in place of fiat money and, as things stand, support continues to exist for crypto exchanges and the trading of cryptocurrencies.
The support from the Ministry of Finance and the anticipated passing of the Digital Assets Regulation Bill has led to a number of exchanges providing platforms in Russia for cryptocurrency trading.
Two of the more popular exchanges supporting the buying and selling of cryptocurrencies, including Ethereum, are Binance and CEX.IO.
To buy Ethereum on CEX.IO, follow the steps below:
Step 1 – Download and Open a Digital Wallet
Digital wallets are needed to hold purchased cryptocurrencies and are also needed to be able to send and receive cryptocurrencies in a safe and secure environment.
There are a vast number of wallets to choose from, including cold and hot wallets, a hot wallet being one that is connected to the internet, allowing the transfer of coins between wallets, while cold wallets are used for those looking to hold coins for a longer period of time.
In the case of buying Ethereum, in addition to security considerations, compatibility with the Ethereum blockchain is particularly important and so, we recommend that the digital wallet chosen is one that is also recommended by the Ethereum team.
There are various types of wallets that can hold Ethereum. For the Ethereum official wallet click here.
Ethereum Hardware wallets are the most secure way of storing Ether. The main ones are Ledger and TREZOR.
There are free software wallets but are less secure because they are often connected to the internet and can, therefore, be hacked. The main ones are Exodus, Jaxx, and MyEtherWallet.
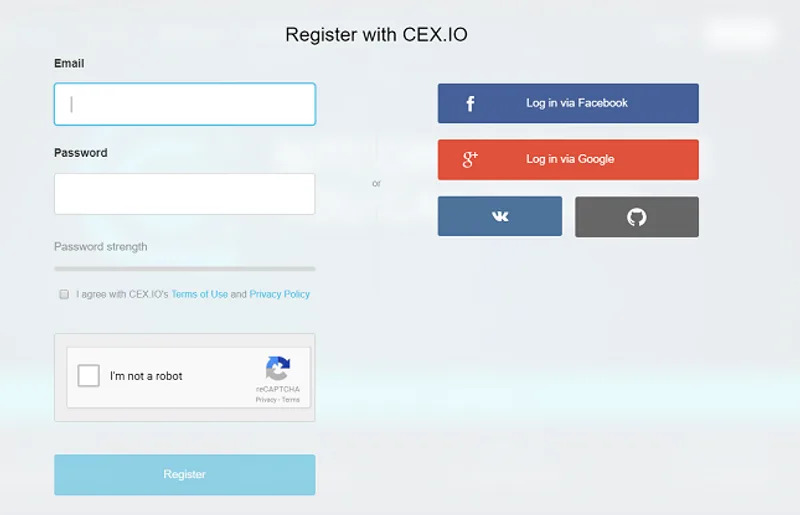
Step 2 – Register and Open an Account
Go to the CEX.IO website, register and open an account. It is always recommended that Two-Factor Authentication (“2FA”) is selected in the account opening process, ensuring greater security measures to protect funds within your account.
Step 3 – Receive the 2FA Code
As mentioned above, we strongly recommend enabling the 2FA functionality to ensure a more secure account. In order to receive the 2FA Code, you will be prompted to select how you would like to receive the code, once you select the option to buy Ethereum.
Complete the necessary fields. In the case of receiving the 2FA Code by SMS or Phone Call, select the country and enter your mobile phone number.
Select preferred method of receipt and upon receipt, enter the 2FA Code.
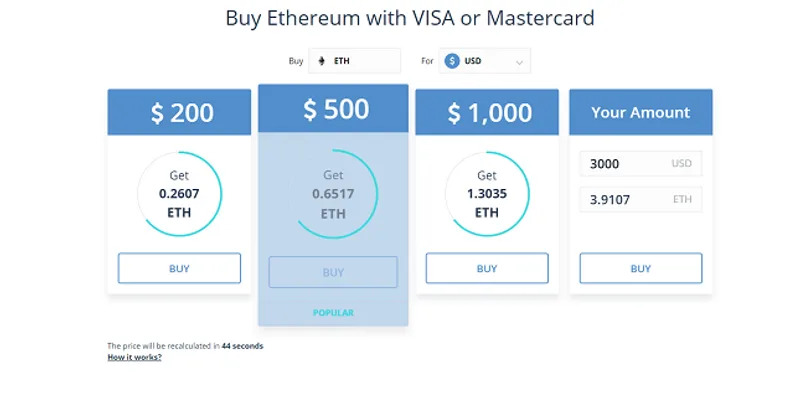
Step 4 – Purchase Ethereum
Once entered, you can purchase your Ethereum coins. For those looking for smaller funded investment sizes, it is possible to buy a fraction of an Ethereum coin rather than having to buy a single coin at a far higher amount. As shown below, you can select your investment size as opposed to the number of coins.
Once this final step has been completed, you own Ethereum coin, next step will be to transfer the coins to your digital wallet.